


Yokogawa AQ6370D How do I acquire test data on a spectrometer?


Usually, after we finish the spectral scanning and get the corresponding spectral analysis results, we will save the test data of the moment for data statistics or data backup. So for Yokogawa spectrometer, what are the methods to save and export the data of each test to PC? In this issue, we briefly summarise several ways to save and transfer test data of Yokogawa spectrometer, if you need to know more tips, welcome to leave a message to us. Get the OSAVIEWER software mentioned in the article.
Use a USB stick or a network cable:
Save the test data inside the spectrometer, wait until the user needs to view or check and then read it out through the spectrometer. When saving, we just need to do it under the File menu, which is the first choice of most users.
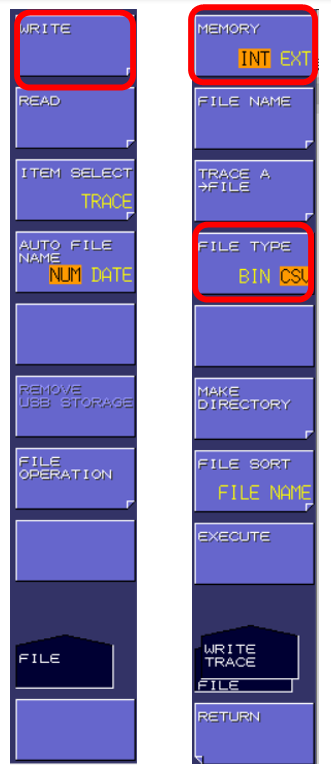
In this step, when we plug in a USB stick in the USB port of the spectrometer, and then directly select EXT as the storage location via FILE-Write-Memory (INT or EXT), then the next saved file will be directly stored on the USB stick. This is the more convenient way.
(Note: It is recommended to change the File Type to CSV so that the saved data can be viewed with EXCEL).
If the test data has already been saved on the spectrometer (Memory is selected as INT), the files can be copied to the USB memory stick together. The procedure of this method is as follows:
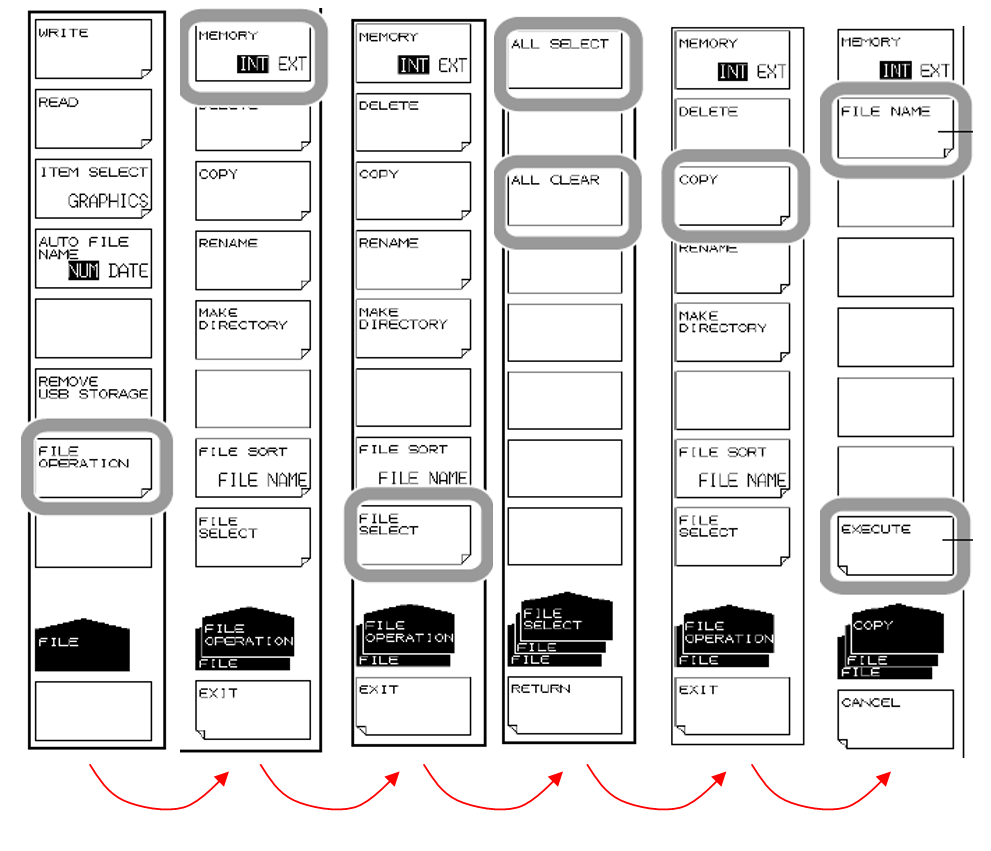
Select FILE menu>>Select FILE OPERATION>>Path select INT>>Select FILE SELECT for file selection, you can select all (ALL SELECT) can also be free to choose>>and then click COPY, at this time, if the target location for the U-disk, change the Memory to EXT>>and then click EXECUTE, finish! operation.
Export data to computer via network cable
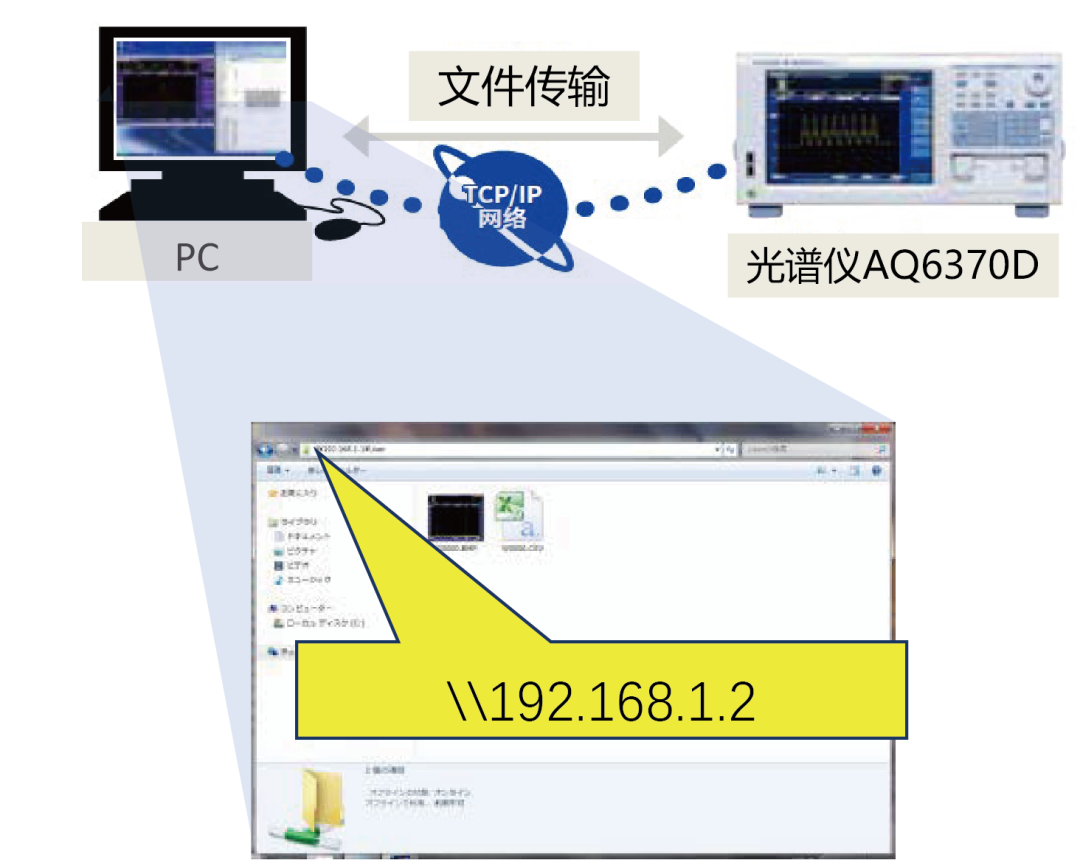
Connect to a computer via a network cable and access the storage space corresponding to the IP address of the spectrometer (only supported by AQ6370D and later versions). Since all Yokogawa spectrometers come with an Ethernet interface, it is easy to communicate between the computer and the spectrometer via a network cable; users only need to configure the IP addresses of the computer and the spectrometer. Users only need to configure the IP addresses of the computer and the spectrometer. Default parameters such as user name, password, port number, etc. can be used, but make sure that the IP addresses of the computer and the spectrometer are in the same network segment, e.g., IP of the computer: 192.168.1.3 with a subnet mask of 255.255.255.0; IP of the spectrometer: 192.168.1.2 with a subnet mask of 255.255.255.0; the last digit of the IPs of the computer and the spectrometer are not the same. The last bit of the IPs of the computer and the spectrometer are not the same. If the spectrometer and computer are directly connected by a network cable, there is no need to set up a gateway. The steps to set up this method are as follows:
[[Yokogawa AQ [[Yokogawa AQ6370D How to get the test data on the spectrometer_9.png]]Under the System(2/2) menu, set Remote Interface to Net(SOCKET), then under Network Setting, set TCP/IP SETTING (as above to set the IP address), and set IP ADDRESS and SOCKET in it. Set IP ADDRESS and SUBNET MASK in it (you can refer to the above example).
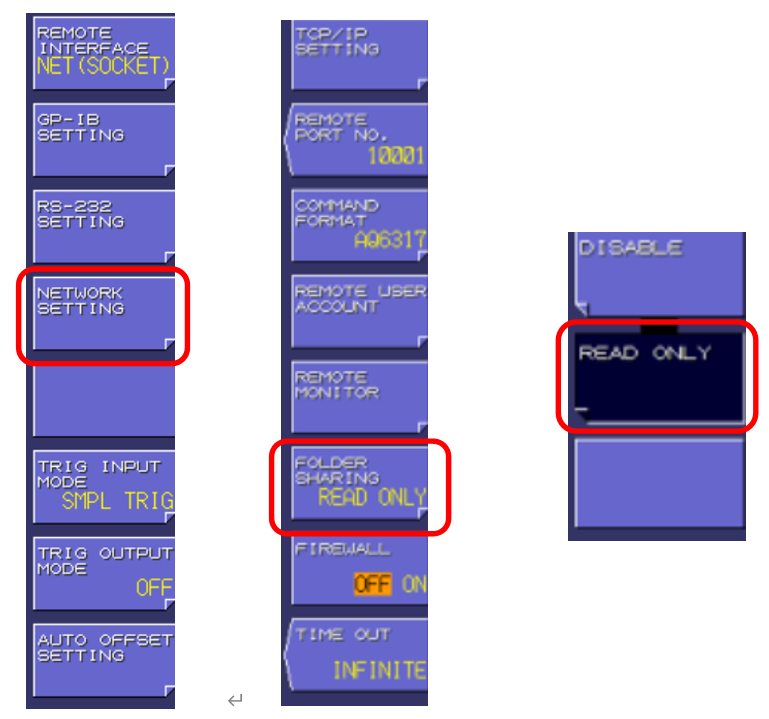
Then set the FOLDER SETTING to READ ONLY.
Finally, just type "\\\ + spectrometer IP" in the address bar of the file explorer on your computer to access the shared directory where the files are saved on the spectrum. Users can copy, delete, paste, etc. normally. This is the most convenient method so far.
Transferring and saving data with Yokogawa's free software
It is possible to transfer files via the free software provided by Yokogawa, but only if you first save the data in the spectrometer and then use the software for file transfer. Of course this also requires an IP address as in the second method.
Let's open the OSAVIEWER software (leave a message "OSAVIEWER software" to get the download link).
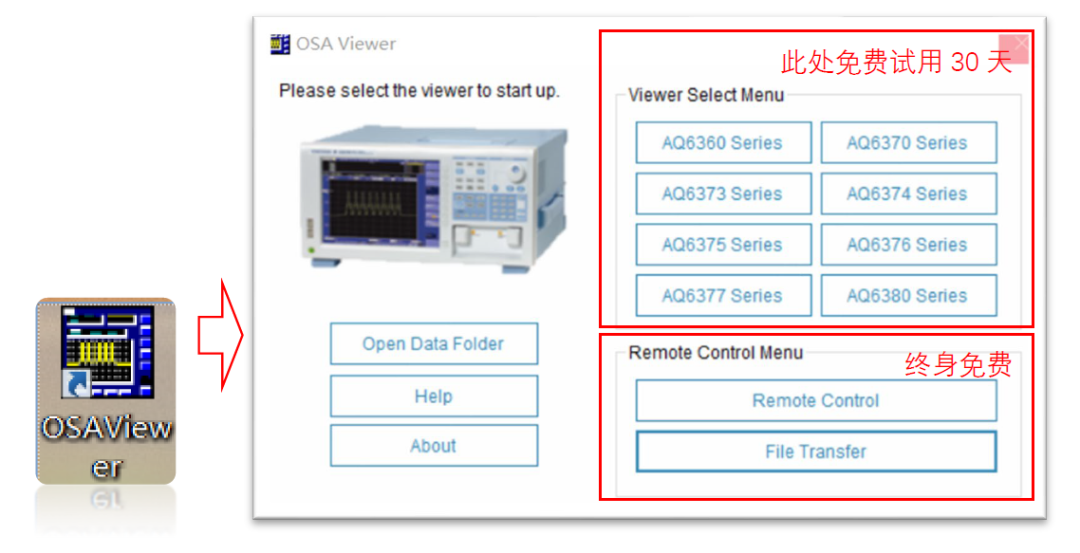
Here we use the free part of File Transfer. (Note: Remote Control is also a free programmable control software, you are welcome to use it). After clicking File Transfer, enter the OSA IP into the pop-up dialogue box (refer to Method 2).
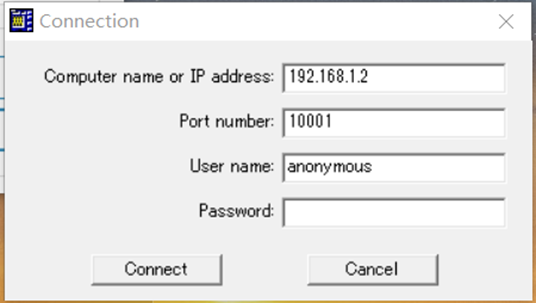
After correctly entering the user name or IP address of the spectrometer, click Connect to connect and the following programme interface will appear. You can download files, upload files, delete files, create new folders, and so on. It is also very convenient! Give it a try.
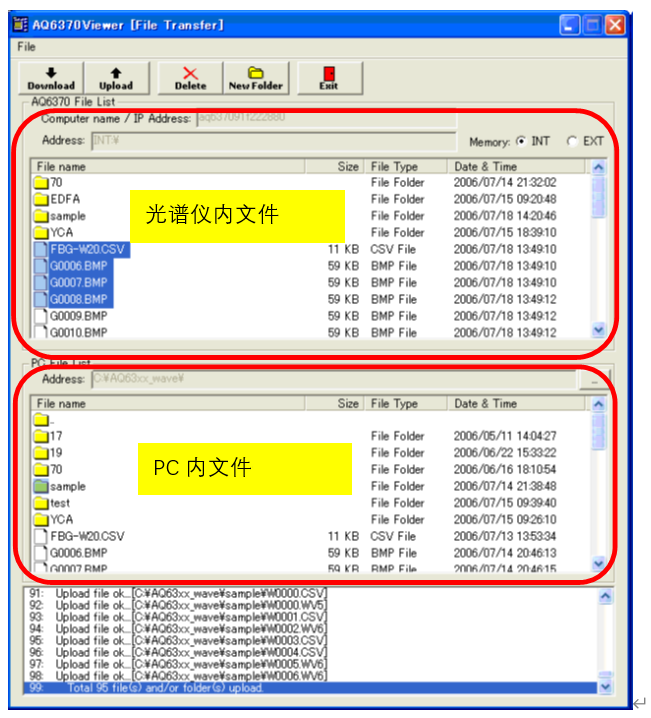
The difference between this procedure and method 2 is that it can download files and also upload files to the spectrometer's internal memory. In the second method, you can only download files but not upload files to the spectrometer's memory through the Folder Sharing method!
Usually, after we finish the spectral scanning and get the corresponding spectral analysis results, we will save the test data of the moment for data statistics or data backup. So for Yokogawa spectrometer, what are the methods to save and export the data of each test to PC? In this issue, we briefly summarise several ways to save and transfer test data of Yokogawa spectrometer, if you need to know more tips, welcome to leave a message to us. Get the OSAVIEWER software mentioned in the article.
Use a USB stick or a network cable:
Save the test data inside the spectrometer, wait until the user needs to view or check and then read it out through the spectrometer. When saving, we just need to do it under the File menu, which is the first choice of most users.
In this step, when we plug in a USB stick in the USB port of the spectrometer, and then directly select EXT as the storage location via FILE-Write-Memory (INT or EXT), then the next saved file will be directly stored on the USB stick. This is the more convenient way.
(Note: It is recommended to change the File Type to CSV so that the saved data can be viewed with EXCEL).
If the test data has already been saved on the spectrometer (Memory is selected as INT), the files can be copied to the USB memory stick together. The procedure of this method is as follows:
Select FILE menu>>Select FILE OPERATION>>Path select INT>>Select FILE SELECT for file selection, you can select all (ALL SELECT) can also be free to choose>>and then click COPY, at this time, if the target location for the U-disk, change the Memory to EXT>>and then click EXECUTE, finish! operation.
Export data to computer via network cable
Connect to a computer via a network cable and access the storage space corresponding to the IP address of the spectrometer (only supported by AQ6370D and later versions). Since all Yokogawa spectrometers come with an Ethernet interface, it is easy to communicate between the computer and the spectrometer via a network cable; users only need to configure the IP addresses of the computer and the spectrometer. Users only need to configure the IP addresses of the computer and the spectrometer. Default parameters such as user name, password, port number, etc. can be used, but make sure that the IP addresses of the computer and the spectrometer are in the same network segment, e.g., IP of the computer: 192.168.1.3 with a subnet mask of 255.255.255.0; IP of the spectrometer: 192.168.1.2 with a subnet mask of 255.255.255.0; the last digit of the IPs of the computer and the spectrometer are not the same. The last bit of the IPs of the computer and the spectrometer are not the same. If the spectrometer and computer are directly connected by a network cable, there is no need to set up a gateway. The steps to set up this method are as follows:
[[Yokogawa AQ [[Yokogawa AQ6370D How to get the test data on the spectrometer_9.png]]Under the System(2/2) menu, set Remote Interface to Net(SOCKET), then under Network Setting, set TCP/IP SETTING (as above to set the IP address), and set IP ADDRESS and SOCKET in it. Set IP ADDRESS and SUBNET MASK in it (you can refer to the above example).
Then set the FOLDER SETTING to READ ONLY.
Finally, just type "\\\ + spectrometer IP" in the address bar of the file explorer on your computer to access the shared directory where the files are saved on the spectrum. Users can copy, delete, paste, etc. normally. This is the most convenient method so far.
Transferring and saving data with Yokogawa's free software
It is possible to transfer files via the free software provided by Yokogawa, but only if you first save the data in the spectrometer and then use the software for file transfer. Of course this also requires an IP address as in the second method.
Let's open the OSAVIEWER software (leave a message "OSAVIEWER software" to get the download link).
Here we use the free part of File Transfer. (Note: Remote Control is also a free programmable control software, you are welcome to use it). After clicking File Transfer, enter the OSA IP into the pop-up dialogue box (refer to Method 2).
After correctly entering the user name or IP address of the spectrometer, click Connect to connect and the following programme interface will appear. You can download files, upload files, delete files, create new folders, and so on. It is also very convenient! Give it a try.
The difference between this procedure and method 2 is that it can download files and also upload files to the spectrometer's internal memory. In the second method, you can only download files but not upload files to the spectrometer's memory through the Folder Sharing method!