


Keithley 2400 Series (2410,2420,2430) Multifunction Power Meters - Easy Operation Manual (2)


E. Compensated Resistance (Offset Compensated Ω)

1. Wiring is shown in Figure 3-1.
2. Press "CONFIG", then "FCTN", select "OFF-COMP-OHMS" and press "ENTER".
3. Set I1 and I2. 4.
4. Press SOURCE I.
5. Press "FCTN".
6. Press OUTPUT ON/OFF to output power.
7. Read the measured value from the panel.
F. Measurement of Varistor α (Varistor α)

1. Wiring is shown in Figure 3-1.
2. Press "CONFIG", then "FCTN", select "VAR-ALPHA" and press "ENTER".
3. Set I1 and I2.
4. Press SOURCE I.
5. Press "FCTN". 6.
6. Press OUTPUT ON/OFF to output power.
7. Read the measured value from the panel.
G. Measurement voltage coefficients

1. Wiring is shown in Figure 3-1.
2. Press "CONFIG", then "FCTN", select "VOLT-COEFF" and press "ENTER".
3. Set V1 and V2.
4. Press SOURCE V.
5. Press MEAS "FCTN.
6. Press OUTPUT ON/OFF to output power.
7. Read the measured value from the panel.
Measurement Percentage

1. Wiring is shown in Figure 3-1.
2. Press "CONFIG", then "FCTN", select "%DEV" and press "ENTER".
3. Set the reference value "REF".
4. Set the reference high/low tolerance range "HI TOL" and "LO TOL".
5. Press SOURCE I or V.
6. Press MEAS "FCTN".
7. Press OUTPUT ON/OFF to output power.
8. Read the measured value from the panel.
Power Sweep Settings
The 2400 has four scanning modes: linear staircase, logarithmic staircase, custom, and source memory. The four modes are briefly described as follows: Linear staircase
As shown in Figure 4-1, you must set the START, STOP, STEP, DELAY, and DELAY times.
Logarithmic staircase scanning
As shown in Figure 4-2, you must set the START, STOP, NO OF POINTS, and DELAY.
Custom Waveform Scanning
As shown in Figure 4-3, the number of points to be scanned (#-POINTS), the alignment of each point (ADJUST-POINTS), and the delay time (DELAY) must be set.
Memory Scan (source memory)
We can store different measurement configurations in the memory, and then scan through the memory to do different configurations of the test, up to 100 sets of different measurement configurations. For example, for a component to be tested, I want to send voltage to measure current, then send current flow voltage, and finally measure its resistance value, then I can store the setting of sending current flow voltage into memory, then store the setting of sending current flow voltage, and finally store the setting of resistance measurement, and then do the memory scan after completing the above settings to complete the above three kinds of tests in sequence.
A. Linear staircase wave scanning (linear staircase)
1. Choose to send voltage (press "V") or current (press "I").
2. Press "CONFIG" and then "SWEEP" to enter the "TYPE" option and select "STAIR".
3. Enter into START setting, press EDIT left and right to change the cursor position, you can set the value by pressing each key directly (e.g. "LOCAL" means "0", "REL" means "1"). Press "LOCAL" to set the value (e.g. "LOCAL" means "0", "REL" means "1"...), or press ▲ and ▼ to change the value in sequence, and then press "ENTER" after making sure.
4. Same as step 3, set the end position (STOP) and step size (STEP), and then return to the scanning setting menu (CINFIGURE SWEEPS).
5. Select "SWEEP COUNT" to choose the number of scanning cycles, "FINITE" can be set to a limited number of cycles, "INFINITE" 1011 can be unlimited scanning.
6. Go back to the scanning setting menu (CINFIGURE SWEEPS) and enter "SOURCE-RANGING" to set the power range mode setting, "BEST-FIXED", "AUTO-RANGE" or "FIXED". For detailed description of the above three power range modes, please refer to page 10-10 of the User's Manual.
7. After making the above settings, press the "EXIT" button to return to the main screen, press the "CONFIG" button and then press the "TRIG" button to enter the "TRIG-LAYER", and then enter the "DELAY" option to set the delay time (DELAY).
8. Return to the main screen, press "ON/OFF" to output power, and then press "SWEEP" to scan and measure automatically. 9.
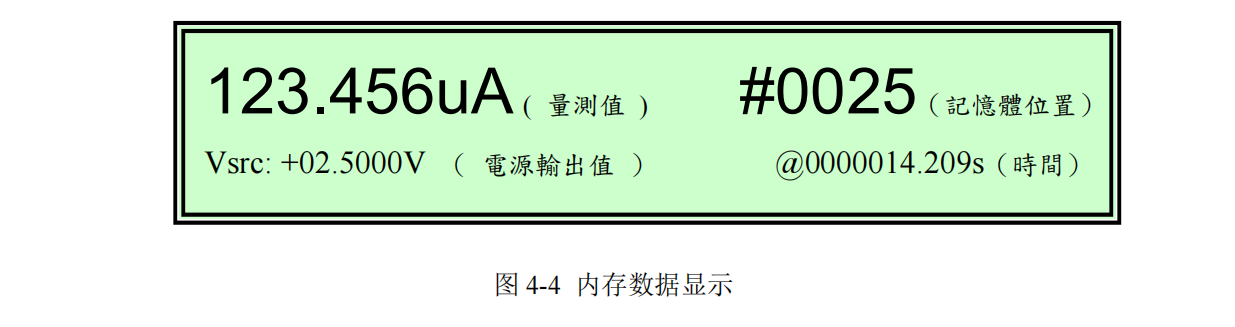
9. After scanning, press "ON/OFF" again to turn off the power, and press "RECALL" to display the measured values stored in the memory, as shown in Fig. 4-4. You can press ▲ and ▼ to change the memory position to select the measured values under different scanning alignment, and the time is displayed in the lower right corner (with the time of the start of measurement as the reference time).
B. Logarithmic staircase scanning
1. Choose to send voltage (press "V") or current (press "I").
2. Press "CONFIG" and then "SWEEP" to enter the "TYPE" option and select "LOG".
3. Enter into START setting, press EDIT left and right to change the cursor position, you can set the value by pressing each key directly (e.g. "LOCAL" means "0", "REL" means "1"). Press "LOCAL" to set the value (e.g. "LOCAL" means "0", "REL" means "1"...), or press ▲ and ▼ to change the value in sequence, and then press "ENTER" after making sure.
4. Same as step 3, set the STOP and NO OF POINTS, then return to the CINFIGURE SWEEPS.
5. Select "SWEEP COUNT" to choose the number of scanning cycles, "FINITE" can be set to a limited number of cycles, and "INFINITE" can be scanned without limitation.
6. Go back to the scanning setting menu (CINFIGURE SWEEPS) and enter "SOURCE-RANGING" to set the power range mode setting, "BEST-FIXED", "AUTO-RANGE" or "FIXED".
For detailed description of the above three power range modes, please refer to page 10-10 of the User's Manual.
7. After making the above settings, press the "EXIT" button to return to the main screen, press the "CONFIG" button and then press the "TRIG" button to enter the "TRIG-LAYER", and then enter the "DELAY" option to set the delay time (DELAY).
8. Back to the main screen, press "ON/OFF" to output power, and then press "SWEEP" to scan and measure automatically.
9. After scanning, press "ON/OFF" again to turn off the power, and press "RECALL" to display the measured values stored in the memory, as shown in Fig. 4-4. You can press ▲ and ▼ to change the memory position, select the measured values under different scanning alignment, and display the time in the lower right corner (with the time of the beginning of the measurement as the base time).
C. Custom waveform scanning (custom)
1. Choose to send voltage (press "V") or current (press "I").
2. Press "CONFIG" and then "SWEEP" to enter the "TYPE" option and select "CUSTOM".
3. Enter the setting of Points (#-POINTS), press EDIT left and right to change the cursor position, you can set the value by pressing each key directly (e.g., press "LOCAL" that is, "0", "REL" that is, "1"...). Press "LOCAL" to set the value (e.g. "LOCAL" means "0", "REL" means "1"...), or press ▲ and ▼ to change the value sequentially, and then press "ENTER" after making sure.
4. Return to the CUSTOM SWEEP screen and enter the ADJUST-POINTS setting, the left side represents the first point, the right side represents the alignment of the point, "P0010 : +5.000000 _V" represents the 11th point (the first point is P0000) alignment is "Press EDIT left and right to change the cursor position, and press each key directly to set the value (e.g. press "LOCAL" i.e. "0", "REL" i.e. "1" ...). Press the keys to set the value directly (e.g. "LOCAL" means "0", "REL" means "1"...), or press ▲ and ▼ to change the value sequentially, and press "ENTER" after making sure.
5. If the alignment of consecutive points is the same, e.g., the alignment of the sixth point to the eleventh point is "+3V", then you can enter "INIT" under "CUSTOM SWEEP" to set the alignment value (VALUE), as well as the start point (START PT) and the end point (STOP PT).
6. Select "SWEEP COUNT" to choose the number of scanning cycles, "FINITE" to set a limited number of cycles, and "INFINITE" for unlimited scanning.
7. Go back to the scanning setting menu (CINFIGURE SWEEPS) and enter "SOURCE-RANGING" to set the power range mode setting, "BEST-FIXED", "AUTO-RANGE" or "FIXED".
For detailed description of the above three power range modes, please refer to page 10-10 of the User's Manual.
8. After making the above settings, press the "EXIT" button to return to the main screen, press the "CONFIG" button and then press the "TRIG" button to enter the "TRIG-LAYER", and then enter the "DELAY" option to set the delay time (DELAY).
9. Return to the main screen, press "ON/OFF" to output power, and then press "SWEEP" to automatically scan and measure. 10.
10. After scanning, press "ON/OFF" again to turn off the power, and press "RECALL" to display the measured values stored in the memory, as shown in Fig. 3-3. You can press ▲ and ▼ to change the memory position to select the measured values under different scanning alignment, and the time is displayed in the lower right corner (with the time of the start of measurement as the reference time).
D. Memory scan (source memory sweep)
1. Set the first test pattern you want to measure, including: power, value, bit, speed, etc. Press "MENU" button to select "SAVESETUP/SOURCE MEMORY/SAVE".
2. Press the "MENU" button, select "SAVESETUP/SOURCE MEMORY/SAVE", and choose the memory location you want to store, then press "ENTER" to confirm.
3. Repeat steps 1~2 to store each group of test status in different memory.
4. Click "CONFIG" and then "SWEEP" to enter the "TYPE" option and select "SRC MEMORY".
5. Select the starting memory location you want to scan and the number of points you want to scan.
6. Go back to the CINFIGURE SWEEPS menu, enter the SWEEP COUNT option, and select the number of scanning cycles, "FINITE" can set a limited number of cycles, and "INFINITE" can scan without any limitation.
7. Go back to the Scan Setting menu (CINFIGURE SWEEPS), enter "SOURCE-RANGING" and set the power range mode setting, "BEST-FIXED", "AUTO-RANGE" or "FIXED". For detailed description of the above three power range modes, please refer to page 10-10 of the User's Manual.
8. After making the above settings, press the "EXIT" button to return to the main screen, press the "CONFIG" button and then press the "TRIG" button to enter the "TRIG-LAYER", and then enter the "DELAY" option to set the delay time (DELAY).
9. Back to the main screen, press "ON/OFF" to output power, and then press "SWEEP" to scan and measure automatically.
10. After scanning, press "ON/OFF" again to turn off the power, and press "RECALL" to display the measured values stored in the memory, as shown in Fig. 4-4. You can press ▲ and ▼ to change the memory position to select the measured values under different scanning alignment, and the time is displayed on the lower right corner (with the time of the beginning of the measurement as the base time).
E. Compensated Resistance (Offset Compensated Ω)
1. Wiring is shown in Figure 3-1.
2. Press "CONFIG", then "FCTN", select "OFF-COMP-OHMS" and press "ENTER".
3. Set I1 and I2. 4.
4. Press SOURCE I.
5. Press "FCTN".
6. Press OUTPUT ON/OFF to output power.
7. Read the measured value from the panel.
F. Measurement of Varistor α (Varistor α)
1. Wiring is shown in Figure 3-1.
2. Press "CONFIG", then "FCTN", select "VAR-ALPHA" and press "ENTER".
3. Set I1 and I2.
4. Press SOURCE I.
5. Press "FCTN". 6.
6. Press OUTPUT ON/OFF to output power.
7. Read the measured value from the panel.
G. Measurement voltage coefficients
1. Wiring is shown in Figure 3-1.
2. Press "CONFIG", then "FCTN", select "VOLT-COEFF" and press "ENTER".
3. Set V1 and V2.
4. Press SOURCE V.
5. Press MEAS "FCTN.
6. Press OUTPUT ON/OFF to output power.
7. Read the measured value from the panel.
Measurement Percentage
1. Wiring is shown in Figure 3-1.
2. Press "CONFIG", then "FCTN", select "%DEV" and press "ENTER".
3. Set the reference value "REF".
4. Set the reference high/low tolerance range "HI TOL" and "LO TOL".
5. Press SOURCE I or V.
6. Press MEAS "FCTN".
7. Press OUTPUT ON/OFF to output power.
8. Read the measured value from the panel.
Power Sweep Settings
The 2400 has four scanning modes: linear staircase, logarithmic staircase, custom, and source memory. The four modes are briefly described as follows: Linear staircase
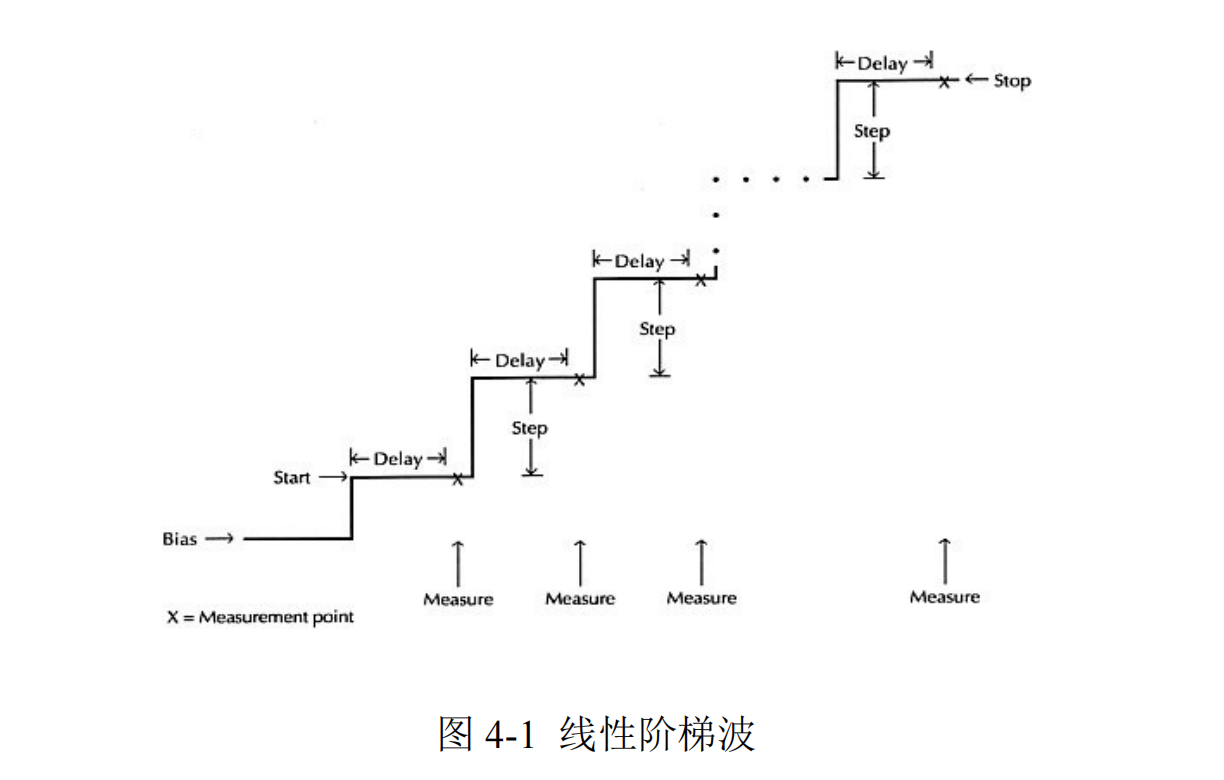
As shown in Figure 4-1, you must set the START, STOP, STEP, DELAY, and DELAY times.
Logarithmic staircase scanning
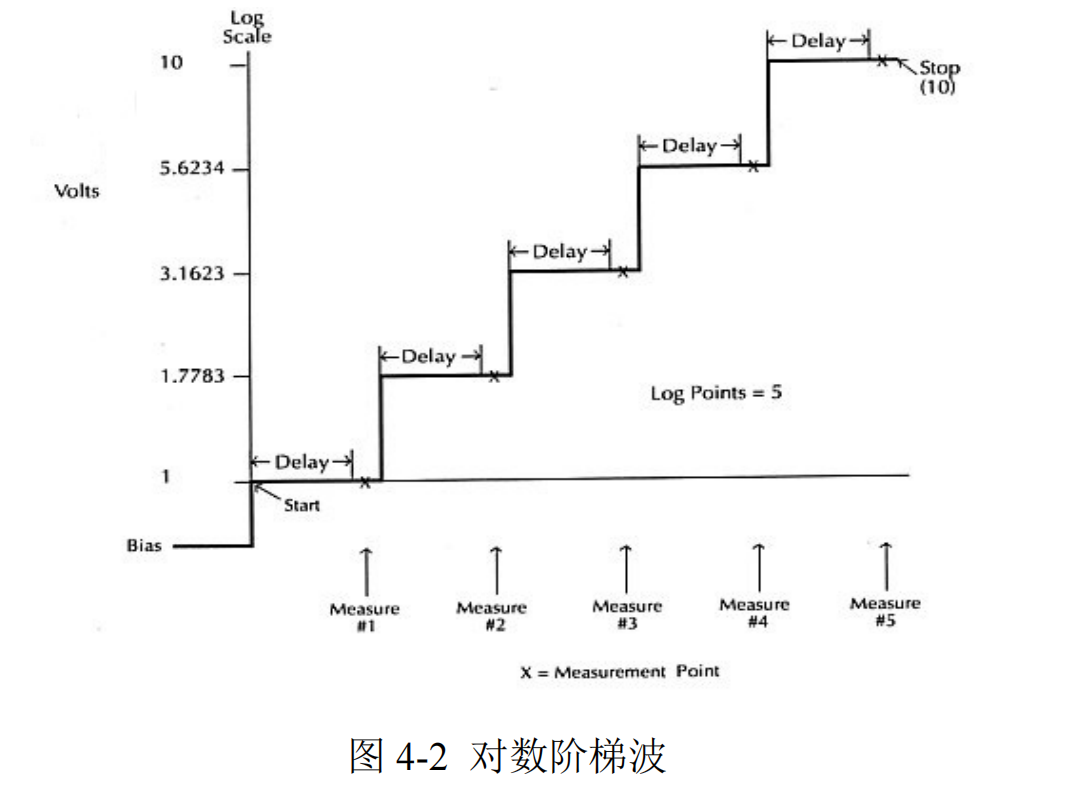
As shown in Figure 4-2, you must set the START, STOP, NO OF POINTS, and DELAY.
Custom Waveform Scanning
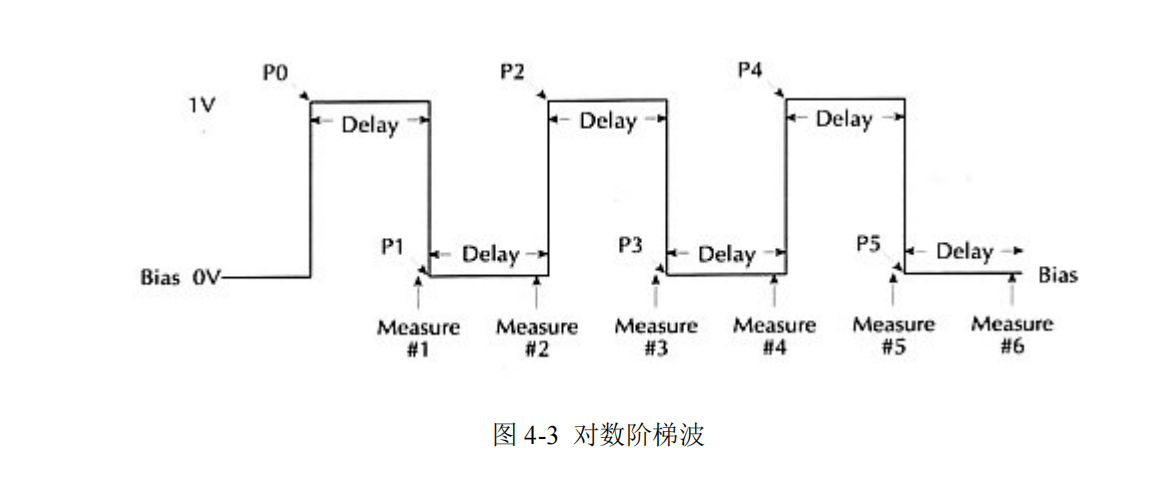
As shown in Figure 4-3, the number of points to be scanned (#-POINTS), the alignment of each point (ADJUST-POINTS), and the delay time (DELAY) must be set.
Memory Scan (source memory)
We can store different measurement configurations in the memory, and then scan through the memory to do different configurations of the test, up to 100 sets of different measurement configurations. For example, for a component to be tested, I want to send voltage to measure current, then send current flow voltage, and finally measure its resistance value, then I can store the setting of sending current flow voltage into memory, then store the setting of sending current flow voltage, and finally store the setting of resistance measurement, and then do the memory scan after completing the above settings to complete the above three kinds of tests in sequence.
A. Linear staircase wave scanning (linear staircase)
1. Choose to send voltage (press "V") or current (press "I").
2. Press "CONFIG" and then "SWEEP" to enter the "TYPE" option and select "STAIR".
3. Enter into START setting, press EDIT left and right to change the cursor position, you can set the value by pressing each key directly (e.g. "LOCAL" means "0", "REL" means "1"). Press "LOCAL" to set the value (e.g. "LOCAL" means "0", "REL" means "1"...), or press ▲ and ▼ to change the value in sequence, and then press "ENTER" after making sure.
4. Same as step 3, set the end position (STOP) and step size (STEP), and then return to the scanning setting menu (CINFIGURE SWEEPS).
5. Select "SWEEP COUNT" to choose the number of scanning cycles, "FINITE" can be set to a limited number of cycles, "INFINITE" 1011 can be unlimited scanning.
6. Go back to the scanning setting menu (CINFIGURE SWEEPS) and enter "SOURCE-RANGING" to set the power range mode setting, "BEST-FIXED", "AUTO-RANGE" or "FIXED". For detailed description of the above three power range modes, please refer to page 10-10 of the User's Manual.
7. After making the above settings, press the "EXIT" button to return to the main screen, press the "CONFIG" button and then press the "TRIG" button to enter the "TRIG-LAYER", and then enter the "DELAY" option to set the delay time (DELAY).
8. Return to the main screen, press "ON/OFF" to output power, and then press "SWEEP" to scan and measure automatically. 9.
9. After scanning, press "ON/OFF" again to turn off the power, and press "RECALL" to display the measured values stored in the memory, as shown in Fig. 4-4. You can press ▲ and ▼ to change the memory position to select the measured values under different scanning alignment, and the time is displayed in the lower right corner (with the time of the start of measurement as the reference time).
B. Logarithmic staircase scanning
1. Choose to send voltage (press "V") or current (press "I").
2. Press "CONFIG" and then "SWEEP" to enter the "TYPE" option and select "LOG".
3. Enter into START setting, press EDIT left and right to change the cursor position, you can set the value by pressing each key directly (e.g. "LOCAL" means "0", "REL" means "1"). Press "LOCAL" to set the value (e.g. "LOCAL" means "0", "REL" means "1"...), or press ▲ and ▼ to change the value in sequence, and then press "ENTER" after making sure.
4. Same as step 3, set the STOP and NO OF POINTS, then return to the CINFIGURE SWEEPS.
5. Select "SWEEP COUNT" to choose the number of scanning cycles, "FINITE" can be set to a limited number of cycles, and "INFINITE" can be scanned without limitation.
6. Go back to the scanning setting menu (CINFIGURE SWEEPS) and enter "SOURCE-RANGING" to set the power range mode setting, "BEST-FIXED", "AUTO-RANGE" or "FIXED".
For detailed description of the above three power range modes, please refer to page 10-10 of the User's Manual.
7. After making the above settings, press the "EXIT" button to return to the main screen, press the "CONFIG" button and then press the "TRIG" button to enter the "TRIG-LAYER", and then enter the "DELAY" option to set the delay time (DELAY).
8. Back to the main screen, press "ON/OFF" to output power, and then press "SWEEP" to scan and measure automatically.
9. After scanning, press "ON/OFF" again to turn off the power, and press "RECALL" to display the measured values stored in the memory, as shown in Fig. 4-4. You can press ▲ and ▼ to change the memory position, select the measured values under different scanning alignment, and display the time in the lower right corner (with the time of the beginning of the measurement as the base time).
C. Custom waveform scanning (custom)
1. Choose to send voltage (press "V") or current (press "I").
2. Press "CONFIG" and then "SWEEP" to enter the "TYPE" option and select "CUSTOM".
3. Enter the setting of Points (#-POINTS), press EDIT left and right to change the cursor position, you can set the value by pressing each key directly (e.g., press "LOCAL" that is, "0", "REL" that is, "1"...). Press "LOCAL" to set the value (e.g. "LOCAL" means "0", "REL" means "1"...), or press ▲ and ▼ to change the value sequentially, and then press "ENTER" after making sure.
4. Return to the CUSTOM SWEEP screen and enter the ADJUST-POINTS setting, the left side represents the first point, the right side represents the alignment of the point, "P0010 : +5.000000 _V" represents the 11th point (the first point is P0000) alignment is "Press EDIT left and right to change the cursor position, and press each key directly to set the value (e.g. press "LOCAL" i.e. "0", "REL" i.e. "1" ...). Press the keys to set the value directly (e.g. "LOCAL" means "0", "REL" means "1"...), or press ▲ and ▼ to change the value sequentially, and press "ENTER" after making sure.
5. If the alignment of consecutive points is the same, e.g., the alignment of the sixth point to the eleventh point is "+3V", then you can enter "INIT" under "CUSTOM SWEEP" to set the alignment value (VALUE), as well as the start point (START PT) and the end point (STOP PT).
6. Select "SWEEP COUNT" to choose the number of scanning cycles, "FINITE" to set a limited number of cycles, and "INFINITE" for unlimited scanning.
7. Go back to the scanning setting menu (CINFIGURE SWEEPS) and enter "SOURCE-RANGING" to set the power range mode setting, "BEST-FIXED", "AUTO-RANGE" or "FIXED".
For detailed description of the above three power range modes, please refer to page 10-10 of the User's Manual.
8. After making the above settings, press the "EXIT" button to return to the main screen, press the "CONFIG" button and then press the "TRIG" button to enter the "TRIG-LAYER", and then enter the "DELAY" option to set the delay time (DELAY).
9. Return to the main screen, press "ON/OFF" to output power, and then press "SWEEP" to automatically scan and measure. 10.
10. After scanning, press "ON/OFF" again to turn off the power, and press "RECALL" to display the measured values stored in the memory, as shown in Fig. 3-3. You can press ▲ and ▼ to change the memory position to select the measured values under different scanning alignment, and the time is displayed in the lower right corner (with the time of the start of measurement as the reference time).
D. Memory scan (source memory sweep)
1. Set the first test pattern you want to measure, including: power, value, bit, speed, etc. Press "MENU" button to select "SAVESETUP/SOURCE MEMORY/SAVE".
2. Press the "MENU" button, select "SAVESETUP/SOURCE MEMORY/SAVE", and choose the memory location you want to store, then press "ENTER" to confirm.
3. Repeat steps 1~2 to store each group of test status in different memory.
4. Click "CONFIG" and then "SWEEP" to enter the "TYPE" option and select "SRC MEMORY".
5. Select the starting memory location you want to scan and the number of points you want to scan.
6. Go back to the CINFIGURE SWEEPS menu, enter the SWEEP COUNT option, and select the number of scanning cycles, "FINITE" can set a limited number of cycles, and "INFINITE" can scan without any limitation.
7. Go back to the Scan Setting menu (CINFIGURE SWEEPS), enter "SOURCE-RANGING" and set the power range mode setting, "BEST-FIXED", "AUTO-RANGE" or "FIXED". For detailed description of the above three power range modes, please refer to page 10-10 of the User's Manual.
8. After making the above settings, press the "EXIT" button to return to the main screen, press the "CONFIG" button and then press the "TRIG" button to enter the "TRIG-LAYER", and then enter the "DELAY" option to set the delay time (DELAY).
9. Back to the main screen, press "ON/OFF" to output power, and then press "SWEEP" to scan and measure automatically.
10. After scanning, press "ON/OFF" again to turn off the power, and press "RECALL" to display the measured values stored in the memory, as shown in Fig. 4-4. You can press ▲ and ▼ to change the memory position to select the measured values under different scanning alignment, and the time is displayed on the lower right corner (with the time of the beginning of the measurement as the base time).